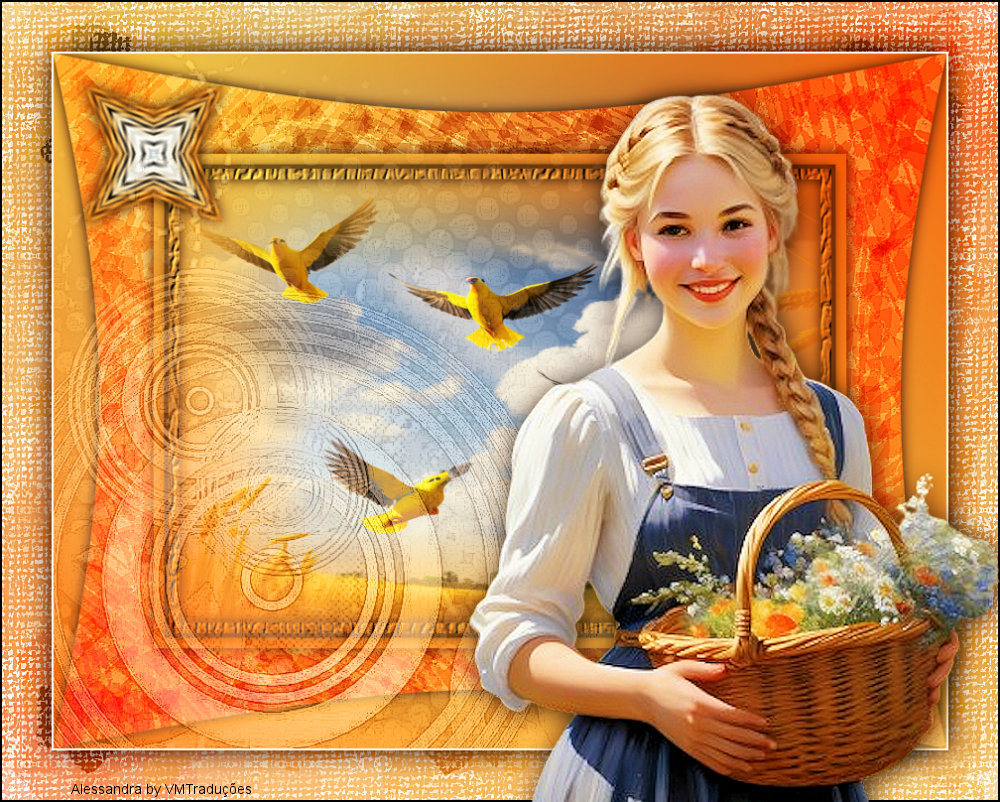
|

This tutorial is from Alessandra, who I thank for
letting me translate her tutorials.
*
Original here
*
Tubes

*
Material

*
Plugins
Impressionist / Charcoal / Dark Transparent
Impressionist / Geometric / Boiling Shiny Bubbles
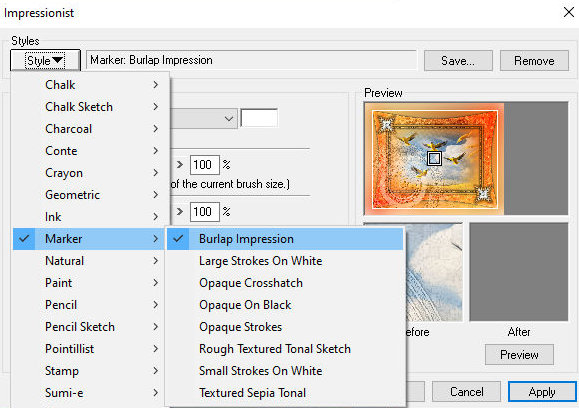
Impressionist / Marker / Burlap Impression
SCRIPT
1.
Open the material on psp / Duplicate (shift+d) / Close the originals
Choose two colors for your tube: a dark color for the foreground and
a light color for the background
2.
Prepare a Linear gradient
Open a new transparent image measuring 900 x 700px
3.
Paint with the gradient
Selections/Select All
4.
Copy the tube misted landscape and paste it into the selection
Select none
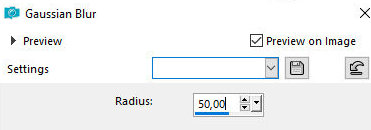
5.
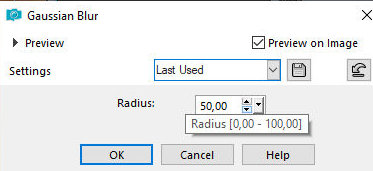
Adjust/blur/Gaussian Blur: 50
Layers / Duplicate - 2 times
Rename the duplicate layers to Raster 2 and Raster 3
6.
Remove the visibility of the Raster 3 layer (click on the eye)
Activate the Raster 2 layer
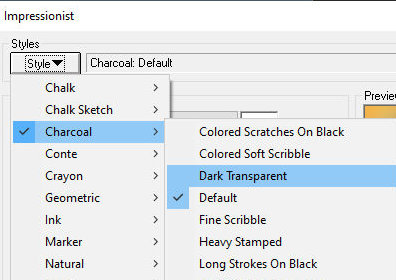
7.
Effects / plugins / Impressionist / Charcoal / Dark Transparent
Effects / Edge Effects / Enhance
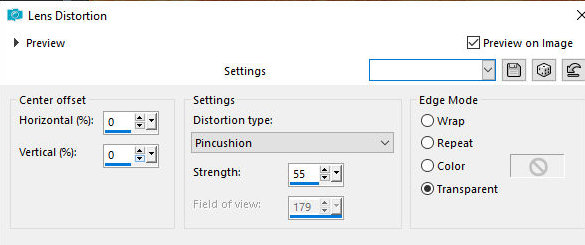
8.
Effects / distortion Effects / Lens distortion
Drop shadow: 0 0 100 20 black
9.
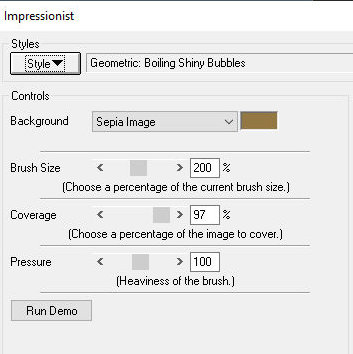
Activate and return the Layer Raster visibility (click on the eye)
Effects / Plugins / Impressionist / Geometric / Boiling Shiny
Bubbles
10.
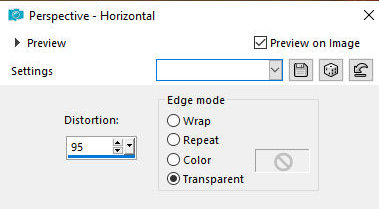
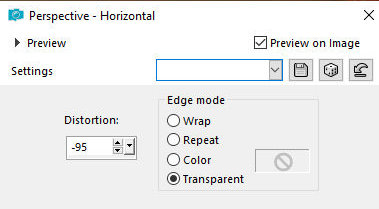
Effects / Geometric Effects / Horizontal Perspective
Repeat Horizontal Perspective with negative value
11.
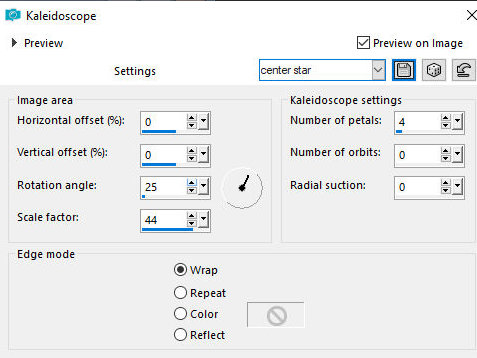
Adjust / Sharpness / Sharpen More
Effects / Reflection Effects / Kaleidoscope - preset [Center Star]
12.
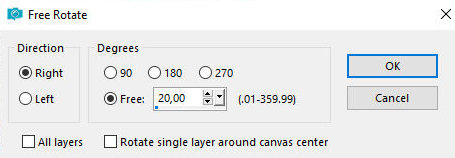
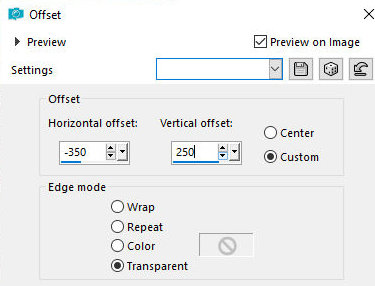
Image / Free rotate / Right/20
Effects / Image Effects / Offset
13.
Drop shadow: 0 0 100 20 black
Layers/duplicate
14.
Image / Mirror / Mirror Horizontal
Image / Mirror / Mirror Vertical
15.
Merge Down
Add new layer
16.
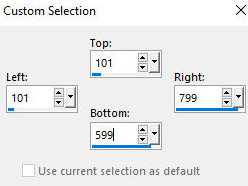
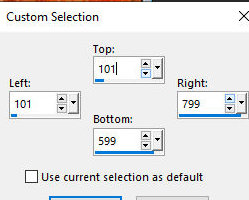
Activate the Selection Tool / Custom Selection and configure:
Paint the selection with the gradient
17.
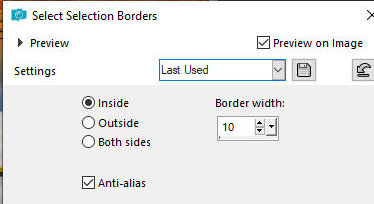
Copy the tube misted landscape and paste it into the selection
Selections / Modify / Select selection borders
18.
Drop shadow: 0 0 100 20 black
Activate the Selection Tool / Custom Selection - same as above
19.
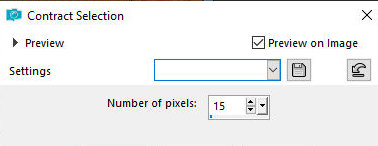
Selections / Modify / Contract=15
Selections / Modify / Select Selection Borders
20.
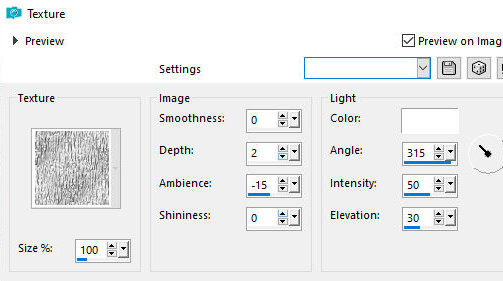
Effects / Texture Effects / Texture - texture [Tin Foil]
Drop shadow: 0 0 100 20 black
21.
Select none
Layers / Arrange / Move down
22.
Add new layer
Layers / Arrange / Bring to top
23.
Paint this layer with the color #ffffff
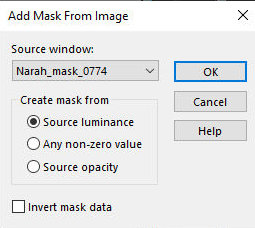
Layers / New Mask Layer / From Image / Mask [Narah_Mask_0774]
Merge Group
24.
Effects / edge Effects / Enhance More
Layers / Properties / Blend mode: Luminance (L)
25.
Layers / Properties / Opacity=60%
Image / Add borders / symmetric marked / 2px / white
26.
Copy this image (edit/copy - it will remain in memory)
Selections / Select all
27.
Image / Add borders / symmetric marked / 50px / background color
Selections/Invert
28.
Paste the image in memory into the selection
Adjust/Blur/Gaussian Blur: 50
29.
Effects / Plugins / impressionist / Marker / Burlap Impression
Adjust / Sharpness / Sharpen More
30.
Selections/Invert
Drop shadow: 0 0 100 40 black
31.
Select none
Image / Add borders / symmetric marked / 2px / black
32.
Copy the tube character and paste as a new layer
Resize and apply Adjust / Sharpness / Sharpen if necessary
33.
Drop shadow of your choice
Merge visible
34.
Image / Resize: 900 x 700px - all layers checked
Put your signature
Merge all
Save as jpeg
*
Se você fizer minha tradução, ficarei
muito feliz se:
> Você me avisar se encontrar algum erro
> Enviar uma cópia da sua versão para meu e-mail *
>Se ao compartilhar você mencionar que utilizou minha
tradução, valorizando assim meu trabalho
*MEU EMAIL
- veramendespsp2@gmail.com Tutorial traduzido em
28/04/2024
*
 |